بواسطة admin | مايو 18, 2022 | Technical information
How to stop unwanted downloads in Windows 10 and installs cumulative updates, This method lets laptops and desktop computers obtain security updates, improve speed, and add features without user intervention, It’s usually because updates include flaws that significantly impact the user experience, Because they need a system restart to finish the installation, they may damage current functionality, present driver and program compatibility issues, below you can discover how to stop unwanted downloads in Windows 10.

Discover How to Stop Unwanted Downloads and Disable Automatic Updates
You don’t have to deactivate Windows Update completely to stop it from downloading a certain update.
Delay Windows Update till the first Patch Tuesday. On Windows 10, the Options app allows you to pause updates for 35 days.
how to stop unwanted downloads and temporarily prevent automatic updates by:
- Update & Security
- Windows Update
- Click Advanced options.
- Options Advanced
- Windows Central
Use the drop-down option under “Pause till” to set a time limit.
Disable Automatic Updates Using Group Policy
On Windows 10 Pro, the Local Group Policy Editor allows you to deactivate automatic updates permanently.
Or adjust the update settings to select when fixes are deployed.
Learn how to stop unwanted downloads and block Windows 10 updates:
- Type gpedit.msc into the search box to launch the Local Group Policy Editor.
- Follow this path:
- Windows Update > Administrative Folders > Windows Modules
- Right-click the Configure Automatic Updates policy.
- Setup Automatic Updates
- Windows Central
- Select Disabled to permanently disable Windows 10 updates.
- GPO deactivate Update
- Windows Central
See also: How to remotely access my router?
Disabling Automatic Updates May be Done in the Registry (Professional Editions Only)
how to stop unwanted downloads using the Registry.
The register may also be modified. This registry hack is identical to the Group Policy setting.
Easily download our Block Automatic Updates on Windows 10 key hack and double-click one of the included.reg files.
Click “Check for updates” after modifying this selection.
Your new setting will appear here when you select “Advanced options”. (Windows Update has to be checked for updates before it detects the change.)
Use Group Policy (Professional Editions Only)
how to stop unwanted downloads using Use Group Policy.
For security reasons, you should leave automatic updates enabled.
There is a setting in Group Policy that allows you to control how updates are deployed on your timetable.
This feature is available in Windows 10 Professional, Enterprise, and Education versions.
Then hit Windows Key + R, input the following into the Run dialogue, and click Enter.
- Computer Configuration> Administrative Templates> Windows Components > Windows Update.
- Setup Automatic Updates.
- Double-click the “Configure Automatic Updates” option in the right pane.
Set it to “Enabled,” then choose your preference.
“Auto download and alert for install” or “Notify for download and notify for install” are examples.
- Save it.
- Dropdown menu for updating configuration.
Conclusion
how to stop unwanted downloads on Windows 10 or 11 and block from installing a problematic update or driver, A free program from Microsoft may stop Windows from downloading updates and drivers, Uninstall them and they will not be installed again unless you unhide them.
Reference
Howtogeek
Windowscentral
بواسطة admin | مايو 18, 2022 | Technical information
Today in this article, we will show how to remotely access my router, that the Internet has become one of the basics of life, Certainly, all of us are exposed to this situation, especially in the case if you are the only person who has experience in this matter, so the feature of your control of the remote router will help you a lot in solving the problem of internet outage when it occurs or adjusting some settings and we will learn about all this in today’s article We will show how to remotely access my router.

Benefits of how to remotely access my router.
If you are outside the house and the internet has been cut off, your family will certainly contact you to solve this problem.
This feature will help you in that in the event that one of the neighbours uses your internet without your knowledge.
Through how to remotely access my router, you can adjust the settings and specify the users.
You can also control the parental settings on your children’s devices and see if they play online games or are studying.
Preparing to Access Your Router Remotely
You have enable “remote sharing” at first, if it’s not enabled you can’t access it when you’re outside.
Remote sharing is just a switch that will let your router available of being accessed remotely.
Unfortunately, you won’t be able to perform this without access to your router, so you’ll have to do it at home.
Type your IP address and key in your admin username and password, and then log in and look for “Remote Access”. Turn it on.
See also: How To Increase Virtual Memory Windows 7
You must enable the sharing feature.
There is a feature that must be installed in your router called the Remote Sharing feature.
So what is the remote sharing feature and how is it installed?
Log in to your browser and type in the IP address of your internet device.
It will show you the IP address of the router as well as its number.
You have now taken the first step in how to remotely access my router.

Activate the remote control feature.
We have taken the first steps to activate this feature, so we know the rest of the steps on how to remotely access my router
After the sharing feature has been activated, log in to the browser.
Enter your IP address, username, address, and passcode.
Look for the optional remote access and activate this option.
Enable DNS and then create a new subname and hostname.
You can now copy the subname and the new hostname and go to the router settings.
Conclusion
We have learned how to remotely access my router and what is the benefit that will accrue to you from using this feature, as you can disconnect the Internet at the time of Your children’s sleep or while studying.
Sources
Thewiredshopper
Computer-wd
بواسطة admin | مايو 18, 2022 | Technical information
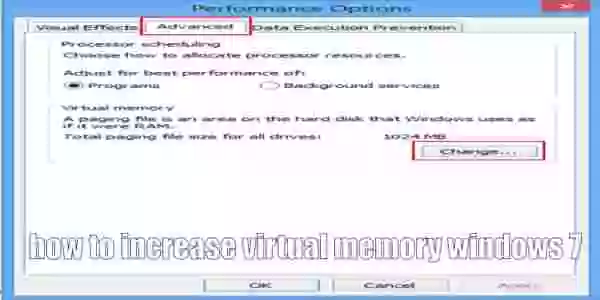
Over time, problems with your computer’s memory might cause it to run slowly, by getting to know how to increase virtual memory windows 7 guide, you’ll learn how to increase the amount of virtual RAM available and improve speed, Low memory is often the issue if you don’t have adequate system memory, using many resource-intensive apps can slow your system down, Here’s how to increase virtual memory windows 7 capacity and solve the difficulties.
Learn How To Increase Virtual Memory Windows 7
If you consume your system’s RAM, it can use virtual memory (also called swap or paging file) to give a temporary expansion.
Your system’s virtual memory achieves this by essentially expanding your RAM.
Virtual memory is quite handy. It enables your system to manage more data for more programs.
Performance may be affected since hard disc memory (or even a quicker solid-state drive) is slower than ultrafast RAM.
When memory is low, the paging file kicks in.
Some RAM data will be transferred to the paging file, freeing up space for high-speed memory operations.
Now, you can discover How To Increase Virtual Memory Windows 7.
Increase Your Virtual Memory
“What More virtual memory must I set?” Is a logical query.
How to boost the paging file size to remove the virtual memory error warning.
- Go to System and Security > System.
- Then choose Advanced System Settings. Now choose Advanced.
- Select Performance > Settings. Go to Advanced. Change Virtual Memory. Here are your VM choices.
The default setting is to set the paging file size for all discs to be automatically managed.
Activate the greyed-out portion underneath. Select the drive to change the paging file size. This is usually C drive.
Changing the Paging File’s Location and Size
How to increase virtual memory windows 7 by configurable virtual memory size
Select a Custom size. Set the maximum size for your paging file, based on your system’s recommendations.
Windows limits the paging file size to three times the installed RAM. For system stability. Amount currently assigned as Initial size.
Click Set, then OK. You have enhanced your system’s virtual memory. +1 Day’s knowledge!
See also: How to create a calendar in Excel 2013 in your computer
Other Ways to Increase Your Virtual Memory
Below, see how to increase virtual memory windows 7.
If your system still runs poorly after adjusting the paging file size, you might consider boosting your RAM.
The only method to expand virtual memory is to increase the system’s total memory.
This will solve the virtual memory problem and perhaps speed up your machine.

Splitting the Page File
How to increase virtual memory windows 7 by Splitting the Page File.
The efficiency of Windows 7 may be improved by dividing the page file over many drives (rather than mere partitions on a single physical disc).
Since Windows 7 can now read data from multiple drives’ page files at once.
The original page file size of 384MB.
For example, might be reduced to 192MB by creating a new page file on the first disc, and another 192MB page file on the second.
Conclusion
The virtual memory in Windows 7 is stored in a page file, regardless of, how much main memory your machine has, If you want to get the most out of your page file, In the next sections, you’ll learn how to increase virtual memory windows 7.
Reference
Hellotech
Technowizah
بواسطة admin | مايو 18, 2022 | Technical information
How to create a calendar in Excel 2013, this question is one of the most popular questions that spread a lot in different search engines, as there are many different ways that can be resorted to in order to create a calendar in this version of the program, In order to learn how to create a calendar in Excel 2013, you need to continue reading the following lines, and follow the correct steps, in an orderly manner.

Reasons to learn how to create a calendar in Excel 2013
When creating tables with a specific data type, sometimes you may need to use a calendar.
In addition, the users want to create, print and use it for household purposes.
Microsoft Office offers several ways to insert a calendar into a table or sheet, which is why you should work hard to learn how to create a calendar in Excel 2013 to take advantage of it in the process of organizing our work.
Create different calendars
All calendars created in Excel can be divided into two large groups, and different ways these ways depend on how the user chooses when learning how to create a calendar in Excel 2013.
These calendars cover a certain period of time (e.g. a year) or perpetual, which they update themselves to the current date.
Accordingly, the methods for creating calendars are somewhat different, in addition, you can make use of a ready-made calendar template.
See also: How to get photos from google drive?
The first method to Create calendar
First, we’ll look at how to create an Excel 2013 calendar for a specific year, and the steps of this method are:
- Determining the direction and place of writing numbers (side or top).
- Select an area of 6 or 7 cells to start creating a year calendar.
- Align the cells, setting their height to be square.
- Select the cells above the row of the first item in the calendar on the “Main” tab in the Dock box, click on the Centre button.
The second way to create a calendar using the template.
The third way to help you learn how to create a calendar in Excel 2013, is by using a template.
Users who still insufficiently own the Excel program or simply do not want to spend time creating a unique calendar can use a ready-made template downloaded from the Internet.
You can find it simply by directing the appropriate query in any search engine.
For illustration, you can specify the following query: “Excel template timetable”.
A ready-made template for Excel
This ready-made Excel calendar template is a ready-made calendar in which you just have to enter holidays, birthdays or other important events.
You can use the Fill button on the Home tab to paint cells containing dates in different colours, depending on their importance.
This method is one of the easiest ways to help you learn how to create an Excel 2013 calendar, it does not need time or effort.

Conclusion
Therefore, we’ve come to the end of our article in which we showed you the easiest ways to learn how to create a calendar in Excel 2013 in an orderly, and very simple steps that do not need any effort.
Source
Microsoft
Wikipedia
بواسطة admin | مايو 18, 2022 | Technical information
Before we know how to get photos from google drive, we must know what Google Drive is first, that the google drive service is a service provided by Google to be used in storage, through which files can be stored and modified It also provides security for your files, as it only allows the owner to access the files, and it also has an OCR feature, which is to identify files through scanning, and we will now display information about google drive as well as how to get photos from google drive.
Learn how to get photos from google drive
It is easy to know how to get photos from google drive
Make sure of the following:
- Ensure that the images are larger than 256 pixels.
- Make sure the image type is suitable.
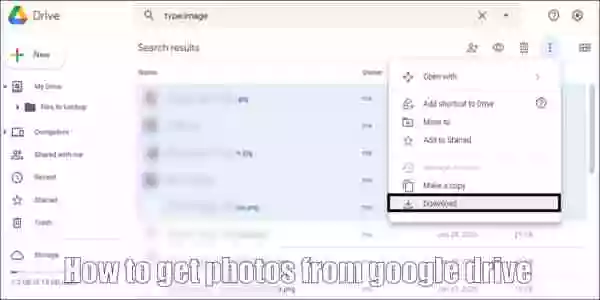
Now let’s learn how to get photos from google drive and upload them to a Google account
- On your computer, go to photos.google.com.
- Click on download google drive at the top left of the page.
- Search for the photo, then click on the photo.
- Click on the option to upload photos.
Recover and find files
In the event that you stored files in google drive and then searched for them and did not find them, follow these tips to find and recover them again:
- Go to the recycle bin and then click on google drive.
- Click on the file you want to restore again.
- Click on the option to restore the file.
- Go to the google drive website.
- Click on the My files option
- Then click on the information option and browse for the file.
See also: YouTube song download by converting video format
Information about google drive
Google created the google drive service in 2012, where this service can be defined as an Internet service that stores files.
The operating system of google drive is the web system, It was programmed through the programming language Python.
The google drive service, files, photos, etc. are stored, through which you can edit and upload photos via the Internet.
Regardless of the type of device you use, as it supports Android devices as well as iPhones and computers as well.
Google Drive tips and tricks
Google Drive is chock-full of user-friendly features and tools, and it will take some time to figure out which ones are ideal for your requirements.
It supports many different file types but if you want to edit files in Google Drive, you will need to convert them to the Google Drive format.
Google Drive is designed to interact with hundreds of third-party apps that allow you to divide and combine PDFs.
So how to get photos from google drive is very easy to learn.

Conclusion
In this article, we learned about how to get photos from google drive, what steps must be followed to upload photos, and we learned about what is google drive service and that it provides security in the process of storing files and only allows the owner to access them, what you provide to users.
Sources
support.google
support.google
بواسطة admin | مايو 18, 2022 | Technical information
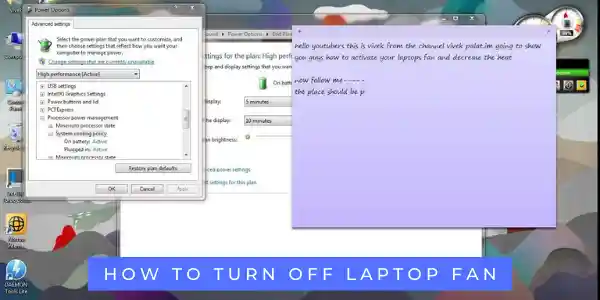
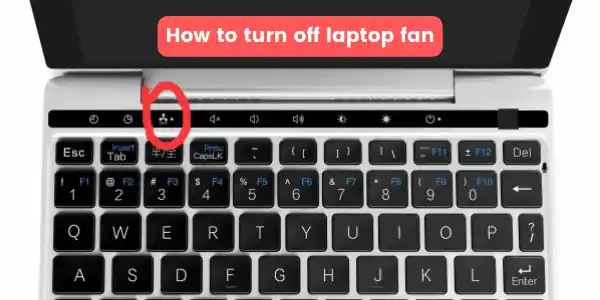
How to turn off laptop fan is the most required question to answer at computer system field because it’s the method of cooling for essential inner additives and frequently heavy masses at the processor and video card can motive a drop with inside the working space of the PC; It is crucial to display the temperature of the system to keep away from harm to gadgets and overheating failure; Depending at the fan, its noise stage, working pace and as a result, you’ll learn at this article how to turn off laptop fan.
Steps to know how to turn off laptop fan
You can learn how to turn off fan by following these steps:
The pc overall performance and cooling performance can also additionally differ.
How to turn off laptop fan Table of Contents three Ways to Disable Fan.
- Turn off the fan thru the BIOS (device setup menu).
- Turn off the fan bodily thru the Motherboard.
- Turn off the fan the usage of Software.
Final Way: The better the rate at which the propellers can operate, the more the impact will be.
The benefit of turning off laptop fans
At the identical time, the noise stage can also add.
(Exactly, it can, because the quantity of noise additionally relies upon the fan model) can also additionally differ.
I will inform you of three methods on how to show off pc enthusiasts if you want to lessen energy utilization and unnecessary noise to your device.
Three Ways to Disable How to turn off laptop thru the BIOS (device setup menu).
See also: What is misfit flash and how to use misfit flash?
Expert solutions on how to turn off laptop fan
Fans in most computers are used as the primary means of cooling for critical internal components and often-heavy loads.
Especially for the processor and video card which can cause a drop in the operating speed of the PC.
It is vital to monitor the temperature of the equipment to avoid damage to units and overheating failure.
The main limitation of such software is that turning fans off will only work on adjustable fans and most of the fans aren’t adjustable.
Relation between the laptop fan’s & speed of pc
Follow the given steps to help you to show off the pc fan thru BIOS:
Step 1: The first step is to restart the pc.
The BIOS menu may be on hand whilst your pc is booting.
Step 2: While your pc is booting preserve down the ideal button (relying on your pc manufacturer’s manual) if you want to input the BIOS menu.
However, the maximum common keys in all likely to be, ‘F2’, ‘F8’, ‘F10’, or ‘F12’ key.
Conclusion
The fan settings will commonly be positioned under “CPU “, “Hardware Monitor” or “Advanced “.and you now know how to turn off laptop fan.
Find such a and press “Enter” to locate the fan settings to alternate its putting into “disabled”.
Reference
Wikpida
digitalworld
